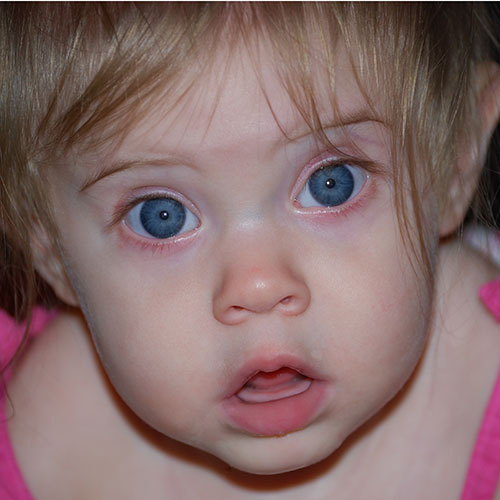
Open up your image in Photoshop. I'm using this free photo from morgueFile

This tutorial describes the various processes involved in creating an enhanced image from a fairly standard baby snapshot. There are many excellent 3rd-party plugins available that will accomplish most - if not all - of these effects, but for the purposes of this tutorial I will only use Photoshop's built-in tools and filters. I am using Photoshop CS4, but most of the tools I'll be using are available in all versions from PS6 onwards. If not, I'll indicate the versions required and suggest an alternative (if possible).
Step 1:
Open up your image in Photoshop. I'm using this free photo from morgueFile
Step 2: Make a "working copy"
The first thing we'll do is make a "working" copy of the original image on a new layer. This is not essential, but I always like to have an unadulterated copy of the original image available in case anything goes horribly wrong. Press Ctrl + J on the keyboard (Command + J on a Mac). Alternatively, in the Layers palette, click and drag the Background layer to the Create a new layer icon. You should now have a layer called Background copy.
Step3: Clean up photo
Once again this is an optional step, but you may want to take this opportunity to "tidy up" your image a little. In real life, babies are very rarely as perfectly clean and cherubic as we may want them to appear in a stylized portrait. In this case, we can see that the little girl in question has a couple of blemishes around her mouth, a stray hair stuck to her cheek and an excess of dribble on her bottom lip. These are all easily removed with the Spot Healing Brush (CS2 & above), the Healing Brush and/or the Clone Stamp tool. I'm not going to go into details about how to use these tools, but I'll just advise you to zoom in to 100%, choose a soft-edged brush, and work slowly and carefully. Here's our cleaned-up photo:
Step 4: Convert to Black & White
There are literally dozens of ways in Photoshop to convert a colour image to black & white. If you have CS3 or CS4, the easiest and quickest way is probably to add a Black & White Adjustment Layer. However, we're going to use a more backwards-compatible method.
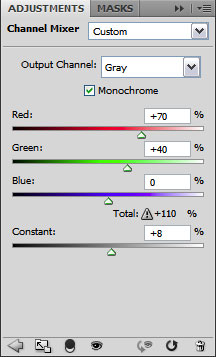
In the Layers palette, click on the Create new fill or adjustment layer icon and then select Channel Mixer ..., or select Layer > New Adjustment Layer > Channel Mixer ... from the menu.
In the Channel Mixer dialog box, check the Monochrome option and then adjust the Red, Green and Blue sliders until your image looks right. Don't worry about whether the totals add up to 100% - we're going for a specific effect here, not a simple monochrome conversion. You can also adjust the Constant slider to lighten or darken the photo. Here are the settings I used:
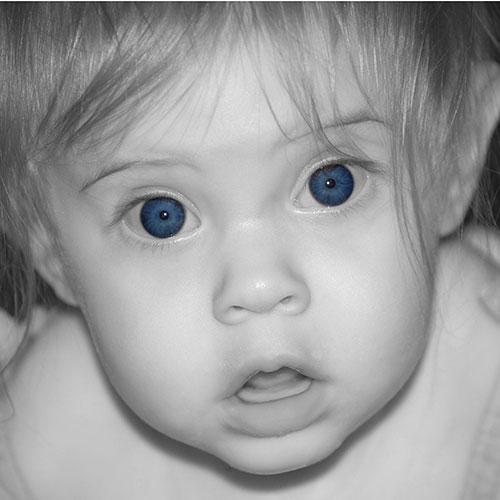
and here's the result:

As you can see, boosting the Red channel has helped minimise any remaining blotchyness of the skin. The pronounced pink colour of her clothing has also faded out and become much less obtrusive.
Step 5: Bring back the eye colour
To bring back the eye colour from the original photo, we're going to do a bit of non-destructive editing.
Press D on the keyboard to set default colours (black foreground and white background), then click on the Channel Mixer's Layer Mask thumbnail in the Layers palette.
Select the Brush tool and choose a hard-edged, round brush. I'm choosing a hard-edged brush because the edges of the irises are very pronounced. If you were wanting to bring back the colour of a softer-edged area (the lips, for example), you would obviously choose a soft-edged brush for this step.
Paint black on the layer mask wherever you want the original colour to show through. If you go "outside the lines", don't worry - swap the foreground colour to white and you can undo any mistakes. This is the joy of non-destructive editing!
Eventually, you should end up with something like this:
Step 6: Adjust eye colour
Again, this is an optional step. I thought the eye colour was a little dark, so here's a method to adjust it.
With the Channel Mixer's layer mask still active, press Ctrl + A on the keyboard (Command + A on a Mac) to select the entire mask. Now right-click on the layer mask and select Subtract Mask From Selection from the context menu. You will now have a selection containing just the areas that you have painted on the mask.
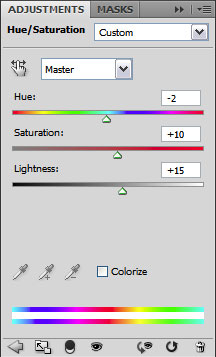
Click the Create new fill or adjustment layer icon at the bottom of the Layers palette and then select Hue/Saturation..., or select Layer > New Adjustment Layer > Hue/Saturation... from the menu. The new Hue/Saturation layer's mask will be set to the selection you made.
Now you can adjust the settings to improve the eye colour. This is obviously a matter of personal taste, but these were the settings I used:
and here is the result:

Step 7: Soft focus effect
Now we're going to create a soft focus effect to add to the stylized feel of the portrait.
Make the top layer in the Layers palette (the Hue/Saturation Adjustment Layer) active by clicking it. Now create a merged copy of your image by pressing Alt + Ctrl + Shift + E on the keyboard (Opt + Command + Shift + E on a Mac).
Select Filter > Blur > Gaussian Blur... from the menu bar. Set the blur to a fairly bold value (I used 10 px, but you may need more or less, depending on your image) and click OK.
(Hot Tip: If you are using CS4, you could convert this layer to a Smart Object so that you can add Gaussian Blur as a Smart Filter at this point)
Now lower the Opacity of the blurred layer to reduce the blurring effect and blend it in with the unblurred version. I set the Opacity to 50%.
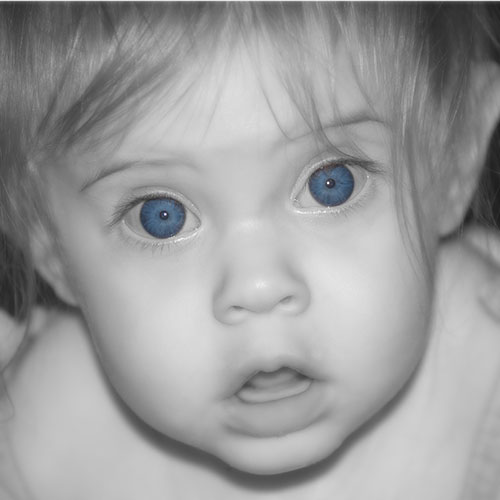
Finally, add a layer mask by clicking on the Add layer mask icon at the bottom of the Layers palette. Select the Brush tool and choose a soft-edged brush. Now paint black on the layer mask wherever you want to completely remove the soft focus effect. I just removed it from the eyes. If you only want to lessen the effect rather than remove it completely you can either lower the Opacity of the Brush tool or paint on the layer mask with a shade of grey, rather than black. Here's the image so far:
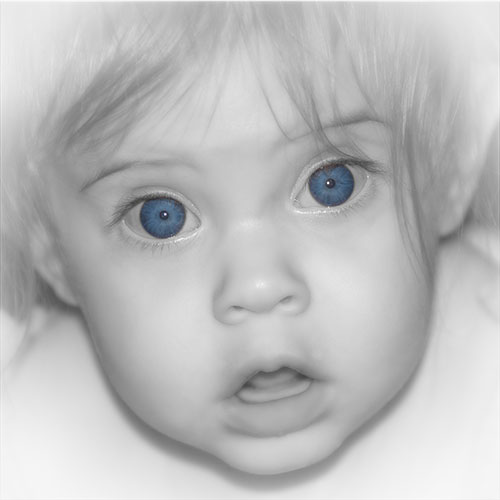
Step 8: Add a white vignette
Finally, we'll add a white vignette to help concentrate the viewer's attention even more. Select the Elliptical Marquee tool and use it to select the area that you want to be within the vignette (the main area of the face in this case):

From the menu bar, select Select > Modify > Feather or press Shift + F6 on the keyboard. Enter a reasonably large number - my original image was quite large so I entered 200 px, but you may need less (or more). Click OK.
From the menu bar, select Select > Inverse or press Shift + Ctrl + I on the keyboard (Shift + Command + I on a Mac) to invert the selection.
With the selection still active, create a new layer at the top of the layer stack. Select Edit > Fill from the menu or press Shift + F5 on the keyboard to bring up the Fill dialog box. Select White in the Contents dropdown box and click OK.
Adjust the opacity of the Vignette layer to suit. I lowered mine to 90%.
Here's the finished image:
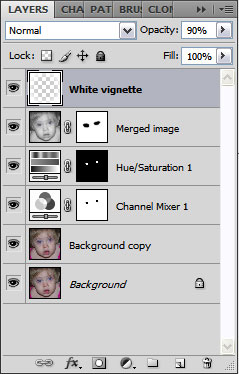
And a final look at the Layers palette:
As usual with these tutorials, very few of the steps are "set in stone". You will most likely need to tweak the various settings to suit your own image, and most of the effects covered here can be achieved in many different ways. Never be afraid to experiment!