This shows a very quick but effective method for converting a bland mid-day photo to a dramatic sunset scene.
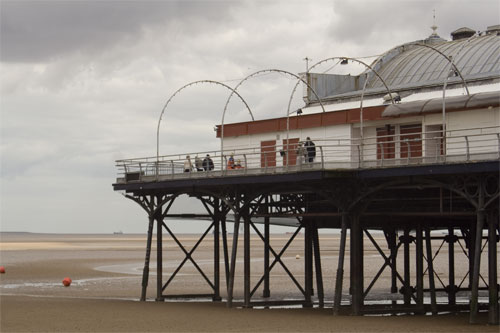
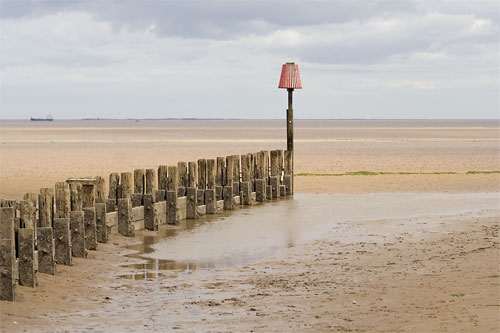
I picked this photo, which I took at a nearby seaside resort:
(This photo has been reduced in size and quality for posting).
The photo was taken at about 1:00pm on a cloudy day, so the lighting is pretty flat.
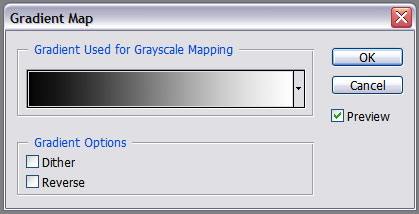
Step 1: Open the photo in Photoshop, then add a Gradient Map adjustment layer (Click the Create new fill or adjustment layer icon at the bottom of the Layers palette and then select Gradient Map, or select Layer > New Adjustment Layer > Gradient Map from the menu). You will see the following dialog box:
Step 2: Click on the gradient in the middle of the dialog box. This opens the Gradient Editor. If your selected gradient is like the one in the dialog box above, you will have two colour stops; a black one at location 0% and a white one at location 100%. Move your cursor to the bottom of the gradient until it turns into a pointy finger, like this:
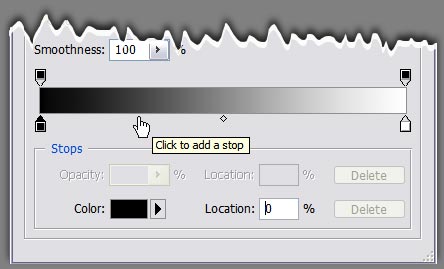
Click to add a new stop, then move the cursor to the right and click again to add one more.
Step 3: Click the second stop from the left (the first one you added) to select it, then click on the colour chip to bring up the colour picker. Pick a very dark brown colour (I chose #330000). For Location, type in 41%.
Edit the other two stops in the same way. Make the 3rd stop a nice rich orange and the 4th one a very pale yellow. Below is a summary of the settings I used, but feel free to experiment with other colours and locations – you could even add more stops if you need to:
| 1st stop: | Colour: #000000 |
| Location: 0% | |
| 2nd stop: | Colour: #330000 |
| Location: 41% | |
| 3rd stop: | Colour: #ff7c00 |
| Location: 70% | |
| 4th stop: | Colour: #f8eee4 |
| Location: 100% |
Your Gradient Editor should now look something like this:

Click OK to apply the Gradient Map.
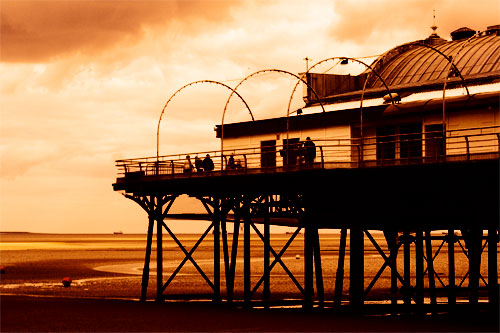
Step 4: With the Gradient Map adjustment layer selected, change the Blending Mode to one of the following: Overlay, Multiply, Darken or Hard Light. Which you choose will depend very much on the tones in your original image, the colours you pick for your Gradient Map, and the final effect you want. If the effect is too strong, try lowering the opacity of the Gradient Map layer.
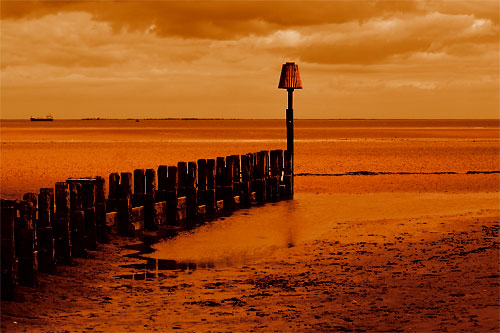
This shows my final image, with the Gradient Map layer blending mode set to Overlay:
Here is a different image, taken at the same place and time:
And here’s the same image with the above gradient map applied, and the layer blending mode set to Multiply:
Of course, this is only the beginning: you could try inserting a Brightness/Contrast, Curves or Levels adjustment layer between the original image and the Gradient Map to further tweak the toning of the image, or use the Gradient Map’s layer mask to vary the effect in different parts of the image. The Devil, as they say, is in the detail, but I hope this brief tutorial gives you some ideas.